Death and Return of Superman Walkthrought
We kick off in good old Metropolis: in The Death and Return of Superman on SNES, the first screens drop you onto shopfront streets and tight alleys, with goons pouring out of doorways in waves. First order of business: break everything breakable—trash cans, signs, crates—for health drops and the occasional extra life. Hold center screen and don’t rush it: lure enemies onto one lane, pop short strings, then clinch into an over-the-shoulder toss—throws thin a crowd better than any risky trade. Gunmen get erased with a jump-in strike, and tanky bruisers are easiest when you bait a slide into a wall so the follow-up throw is a guaranteed finisher. Two knife punks show up? Feather up or down, meet them with an uppercut, then grab and send one sailing through a shop window.
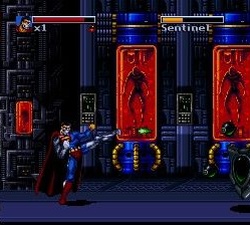
Metropolis. Streets and Doomsday
By mid-stage the pace spikes: armored heavies step in, scaffold sections appear between scenes, and that open barrel yard is best cleared with thrown objects. Keep one barrel in hand till the last moment and save it for the big guy—step up or down to sidestep, bean him from behind, then sprint to the next spawn door so two more don’t slip out. This SNES clear is all about patience: don’t rush the finishers—break spawn points and never let yourself get wrapped.
Your first Doomsday bout is a test of discipline. Don’t brawl in the clinch—he breaks strings and punishes with a screen-long charge. The loop that works: half-step on the diagonal, bait the rush, slide vertically, land two hits into a throw. Don’t stay lined up after a knockdown—his wake-up is fast and mean. Items help you change tempo, but don’t burn them all at once: keep at least one heavy pickup for the end of the phase. When he starts hopping more, swap to jump-in strikes with a back-off—safe chip. A Doomsday fight in The Death and Return of Superman isn’t about raw power—it’s about rhythm.
Subway and tech corridors
Next up: subway platforms and utility tunnels with narrow choke points. On the platform, play the diagonal and avoid letting two stack on you at once: train doors are classic spawn spots—body-block them. Down on the tracks, watch for flicker and sound in the distance: that’s your cue a train’s incoming—hop back up, then drop down and keep swinging. In the tech halls, the “jump—grab—wall toss” string shines: tight rooms double your collision damage. See a lit panel by a door? Break it first, or the soldier wave won’t pause. This is also where the heat vision tap earns its keep—quick shot a turret hiding behind a crate; don’t face-tank it.
The mini-boss here is an armored bruiser with a long string. Don’t rush. Bait the first swing, half-step down, counter, grab, and wall toss. Do it three times—done. If there’s a pipe or broken column on the floor, save it for the enrage when he speeds up. Pro tip: keep him pinned at the right edge of the screen—he “procs” that speed-up less often there.
Flight segments
Then come the flying sections. Hug the top third of the screen and read spawns from the right—rocketeers and drones arrive in packs. A charged eye-beam (hold the button) cuts through tight clusters, while lone turrets go down to short bursts. Big-ship ordnance is slow—slide vertically, then drift back into the firing lane. On the saucer mini-boss, don’t waste shots on the plating—aim for the glowing nodes; pop the top, drop to the bottom, and save your screen-clearing special (“bomb”) for when mines flood the screen. This stretch in Superman: The Death and Return usually hands you an extra life if you avoid damage and scoop up shields.
Reign of the Supermen in your hands
After the events we covered in /history/, you rotate through the new heroes. Steel plays easier: that sledgehammer has chunky reach. Line two foes up, jump heavy, grab, and the second one eats the ricochet. In conveyor rooms, hold the switch side—enemies love flipping them on. Superboy is all tempo: don’t stand still, ride diagonals, clip ranged pests with a quick jump-in and go straight into a grab. Eradicator is the king of interrupts: his energy flare strips shields—just don’t spam it; bank meter for armored targets.
Cadmus Labs are a whole thing. Doors unlock after you smash the pods, so target incubators first before the clones spill out. Watch for sparking floor sections—wait a beat and dash through on the diagonal; don’t idle in the center. Two terminals glow on the walls—the right one shuts off a laser grid, the left calls enemy reinforcements; no guessing needed, just break both quickly starting with the right. Shield-bearers fall for a feint: step in, step back, and the moment he opens—jump strike to the head, then a toss into a pillar. Rare wall cabinets hide health packs—check them all, even the ones that look like set dressing.
Somewhere around here you’ll meet Intergang grenade tossers. Don’t waste long strings: two quick vertical weaves, throw one into the other, and the grenade pops at their feet. In tight rooms, don’t push the wave—edge the screen carefully so the next pair doesn’t spawn behind you. And yep, these corridors love to hide a 1-up behind a fake wall: look for a tile with “off” shadows—hit it and claim your bonus.
Rooftops, wind, and long fights
Metropolis rooftops are all wind and ring-outs. Fight closer to center, especially against jetpack foes: catch them on the drop, jump-in hit, and always finish with a throw—or they’ll bail and come back with a volley. On the long billboard run, enemies hide behind big boxes—knock out the braces and they’ll slide right into you. The rooftop ends with a drawn-out mini-boss sporting a rocket pack: don’t chase him in the air—make him land by standing slightly below his vertical line, then snatch a grab the instant he touches down.
As the Death and Return of Superman story hits its stride near the finale, expect stretches light on healing. Don’t blow supers on fodder—save them for heavy duels. If you’ve got continues, try to enter boss rooms topped up: there are usually a couple of items right before the door that respawn on a screen reset—grab a kit, step out, step back in.
The final duel
No spoilers on the big bad—you’ll see soon enough—but the fight’s rhythm is clean. Cyborg Superman loves a diagonal entry and a straight laser: keep an offset, wait for the shot, arc two steps aside, then flank with a short string into the must-have throw. When he calls drones, delete them immediately: one trade with a drone saves you half a health bar later in the phase. Floor lasers telegraph from a palm flash—once it lights, two quick dodges up and down and you’re back on offense. Remember what we said in /gameplay/: throws are your best friend here—they buy a second of safety and break any boss pressure.
One last trick. In the room before the finale, a couple of “decorations” are secretly destructible: the glass rack and the slim column by the right wall—one hides a final health kit. Check them, even if the clock’s ticking. Also, hit the ending with as many lives as you can—don’t hesitate to replay the previous screen for a clean setup; retro beat-’em-up clears are won by care, not recklessness.
That’s how The Death and Return of Superman—sometimes labeled on carts as “Superman: Death and Return”—really opens up in the details: one lane, one throw, one heat vision shot saved for the clutch. No panic—and Metropolis is yours, with the comic springing to life frame by frame.